Heavy Battle Rope Kit: Sleeve + Anchor for Tough Intervals
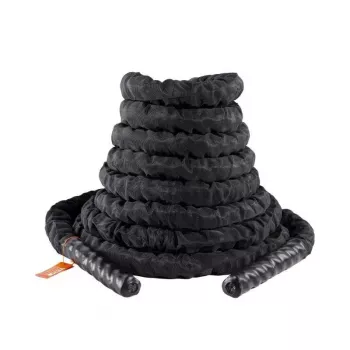
Heavy Battle Rope Training: Power, Conditioning, and Durability in One Compact Setup
Battle rope training delivers a unique mix of strength, power, and high-output conditioning without requiring a big footprint. A heavy rope kit with a protective sleeve and an anchor option keeps sessions stable and repeatable, especially in home gyms, garage setups, and smaller studios where space and equipment simplicity matter. With the right anchor point and a few technique cues, you can build punishing intervals that challenge grip, shoulders, back, core, and legs—while keeping wear and tear under control.
What This Rope Kit Is Built For
A heavy battle rope is designed to create full-body tension through rhythmic waves and forceful slams. The resistance isn’t just “weight”—it’s the rope’s mass, friction, and your ability to keep wave quality consistent for the entire interval.
- Full-body conditioning that emphasizes grip, shoulders, back, core, and legs through waves, slams, and pulls
- Short, intense intervals for metabolic training without complex equipment
- Reliable anchoring and reduced abrasion at contact points to extend usable life
- Indoor or outdoor use when paired with a secure mounting point and appropriate surface
If you’re ready to set up a dedicated station, the Heavy Battle Rope with Protective Sleeve & Anchor is a straightforward way to build a consistent training loop: anchor, warm up, hit intervals, recover, repeat.
Protective Sleeve and Anchor: Why They Matter
Ropes often fail at the same place: the high-friction zone where the rope rubs against an anchor, post, or edge. That’s why a protective sleeve isn’t a cosmetic add-on—it’s a practical durability feature for real-world training spaces.
- Protective sleeve helps reduce fraying where the rope meets the anchor or rubs against edges
- Anchor-ready setup improves consistency of wave patterns and reduces unwanted rope drift
- More stable base can make technique work easier for beginners and interval timing easier for athletes
- Added protection can be especially useful in garage gyms with concrete, metal posts, or rough surfaces
Anchoring also improves training quality. When the midpoint stays put, you can focus on wave height, cadence, and breathing instead of constantly resetting the rope. That matters for interval work where repeatability is the whole point.
How to Set It Up Safely
Battle ropes create dynamic force—fast, repeated pulls and snaps that can stress weak mounting points. A safe setup starts with a mount that’s built for repeated movement, not just static hanging.
- Choose a mounting point that can handle repeated dynamic force (wall stud mount, heavy rack post, or a purpose-built anchor point)
- Position the anchor low enough to keep waves efficient but high enough to avoid scraping the floor excessively
- Leave enough clearance behind and to the sides for wide arm paths and lateral waves
- Check that the protective sleeve sits at the main friction zone (near the anchor contact area)
- Before each session: inspect for loose fibers, damaged sleeve stitching, or anchor wear; replace or repair before heavy use
For training apparel that keeps sweat from turning sessions into a distraction, pair rope intervals with a breathable top like the Men’s Quick-Dry Short Sleeve Sports Shirt – Lightweight Workout & Running Top.
Training Moves and Simple Workouts
Rope training is deceptively simple: your job is to create crisp waves and powerful slams while keeping your posture strong. Start with a few foundational movements, then plug them into repeatable interval formats.
- Foundational moves: alternating waves, double waves, power slams, side-to-side waves, outward circles, inward circles
- Strength focus: rope pull hand-over-hand (if space allows) and kneeling waves to reduce leg drive and isolate upper body
- Beginner interval: 6 rounds of 20 seconds work / 40 seconds rest, rotating alternating waves and slams
- Conditioning interval: 10 rounds of 15 seconds hard / 45 seconds easy, alternating double waves and side-to-side waves
- Finisher: 3 minutes total as 30 seconds steady waves + 15 seconds slams repeated, keeping form crisp
Technique Cues That Improve Results
For general strength and conditioning guidance, reliable frameworks from organizations like ACSM and NSCA emphasize progressive overload, sound technique, and appropriate recovery—principles that apply just as well to battle rope intervals.
Care, Storage, and Surface Tips
Key Specs and What to Look For
| Feature | Why it matters | Practical tip |
|---|---|---|
| Protective sleeve | Reduces abrasion and fraying at high-friction points | Place sleeve where the rope contacts the anchor or edge |
| Anchor setup | Improves stability and repeatability of waves | Mount to a rated point; re-check bolts/straps regularly |
| Length | Longer ropes increase resistance and space needs | Ensure clear floor space and enough distance for full waves |
| Thickness | Thicker ropes usually feel heavier and tax grip more | Choose a thickness that allows clean waves for interval duration |
| Surface | Abrasive surfaces accelerate wear | Use a mat or adjust angle to reduce floor contact |
Who This Setup Fits Best
FAQ
How much space is needed for battle rope training?
Space needs depend on rope length and the movements you use. Plan for a clear run from the anchor to your stance plus extra room for arm swing and lateral waves; shorter ropes generally work better in tighter home or garage setups.
Does the protective sleeve change how the rope feels during training?
The sleeve mainly affects durability at contact points, not resistance. You may notice slight stiffness near the sleeved section, but placing it close to the anchor keeps the feel in your hands essentially the same.
What is a safe way to anchor a battle rope at home?
Use a purpose-built anchor or a heavy rack/post that’s rated for dynamic loads, and avoid weak railings or unstable fixtures. Check hardware frequently, pad any sharp edges to reduce abrasion, and inspect the rope and sleeve before each session.









Leave a comment