3D Metal Type S Emblem: Clean Grille & Trunk Upgrade
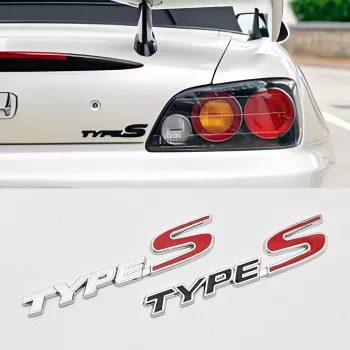
3D Metal Type S Grille Emblem Badge for Car Front & Rear
A small badge can make a front grille or rear trunk line look sharper in minutes. This 3D metal “S” emblem is designed for a clean, sporty finish on either the front or rear of a vehicle, with an install that typically takes only basic prep and careful placement. If you’re after a subtle upgrade that looks intentional (not improvised), focusing on alignment and surface prep is what makes the difference.
What the emblem changes visually
A flat factory surface can look unfinished next to modern trims and darker grille styles. A raised 3D emblem adds dimension without needing a full grille swap or wrap job.
- Adds a raised 3D highlight that stands out from flat factory plastics
- Works as a subtle accent on grilles, trunk lids, tailgates, and select interior trim panels
- Pairs well with blacked-out trims, honeycomb grilles, and gloss/matte wrap themes
- Best results come from symmetric alignment and consistent spacing to nearby trim lines
If you want the cleanest “factory-plus” vibe, choose one strong reference line—like the center of the grille badge area, a trunk crease, or the midpoint between taillights—and commit to it when you place the emblem.
Material, finish, and build details to look for
Not all badges look the same once installed. The goal is a finish that matches your existing accents and edges that don’t catch the eye for the wrong reasons.
- Metal-look badge construction with a dimensional profile for depth
- Smooth edges and uniform paint/plating help it look intentional rather than “stuck on”
- A stable adhesive backing is key for heat, rain, and vibration resistance
- Choose a finish that matches nearby accents (chrome to match brightwork, black to match shadow trim)
For the best bond, surface preparation matters as much as the emblem itself. If you want a reliable, standards-based prep overview, 3M’s guidance on adhesion prep is a helpful reference: 3M VHB Tapes — Surface Preparation.
Front vs. rear placement: choosing the best spot
Both locations can look great, but they behave differently in real life. Grilles see more wind, bugs, and frequent washing; trunks are often flatter and easier to align.
- Front grille placement: aim for a flat or gently curved section to maximize adhesive contact
- Rear placement: trunk or tailgate surfaces are often flatter and easier to align
- Avoid placing over deep texture, heavy curvature, or panel gaps where the adhesive cannot fully bond
- Confirm clearance for hood release handles, cameras, sensors, and active grille shutters (if equipped)
On a honeycomb grille, it’s tempting to stick the emblem wherever it “looks” centered. Instead, prioritize a spot where the entire back of the badge is supported—full contact is what prevents corner lift later.
Fit check before sticking it down
Dry-fitting takes a minute and can save you from a crooked badge that you notice every time you walk up to the car. Before you peel the backing, treat placement like a mini measuring job.
- Dry-fit the badge and step back 6–10 feet to confirm centering and angle
- Use painter’s tape to mark level lines or reference points
- If mounting to a slatted grille, confirm the badge sits fully supported (not bridging open air)
- Test the location with the hood/trunk opening to ensure no rubbing or snagging
Quick pre-install checklist
| Check | Why it matters | Pass criteria |
|---|---|---|
| Surface is clean and dry | Adhesive bonds best to contaminant-free paint/plastic | No dust, wax, oil, or moisture |
| Location is flat enough | Full contact improves long-term hold | Badge sits flush without rocking |
| Centered and level | Prevents a “crooked” look | Tape guide lines align with trim |
| Temperature is suitable | Cold reduces adhesive tack | Moderate ambient temp; panel not icy or hot |
| No interference | Avoids peeling or damage | Doesn’t contact moving parts/sensors |
Installation steps for a clean, lasting bond
A careful install is mostly about preparation, alignment, and steady pressure. If you’re applying the emblem to painted surfaces, go slow and avoid rushing the “last inch” where crookedness shows most.
If you’re looking for the actual badge, the 3D Metal Type S Grille Emblem Badge for Car Front & Rear is an easy way to add a crisp accent without permanent modifications.
Care after installation
For general wash and maintenance best practices (including pressure-wash caution and good routines), see: International Carwash Association — Car Wash Advice.
Common issues and simple fixes
Tools and add-ons that help DIY installs
If you’re already doing small hardware projects on your vehicle (mounting accessories, adding brackets, or repairing panels), the 16″ Rivet Nut Tool Kit with 11 Mandrels & 185pcs Rivnuts Assortment can be a handy companion for DIY installs beyond simple adhesive badges.
FAQ
Can the emblem be installed on both the front grille and the rear trunk?
Yes. Choose a clean, flat (or gently curved) surface on either location, and confirm it won’t interfere with sensors, cameras, or moving panels before pressing it down.
How long should the adhesive cure before washing the car?
Wait at least 24–48 hours before exposing the badge to strong water pressure or aggressive washing. Early on, avoid spraying directly at the emblem’s edges.
Will it stick to textured plastic or a honeycomb grille?
It can, but only if the emblem makes full contact with a supported surface. Deep texture and open gaps reduce bonding, so pick a flatter section or an area with solid backing.









Leave a comment